
Understanding On-site Videography
What is On-site Videography?
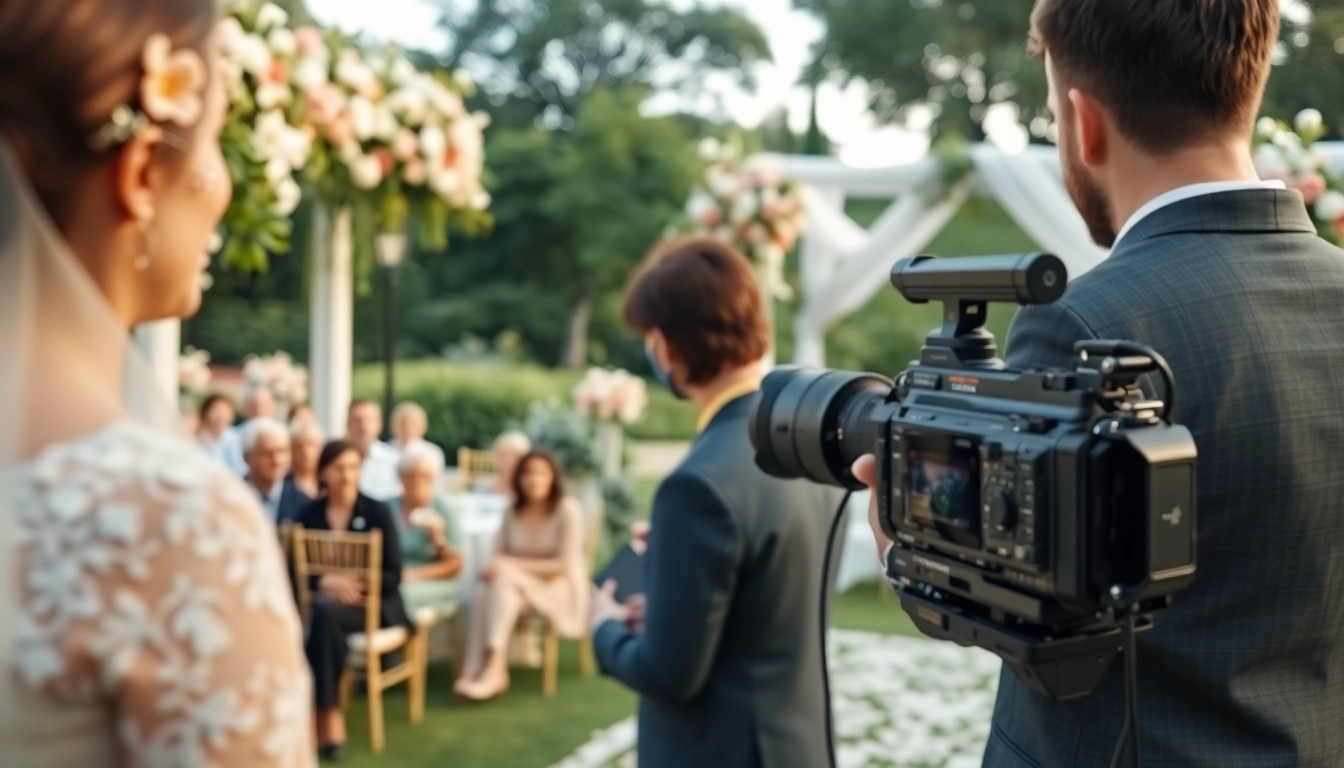
On-site videography refers to the art of capturing video content in a specific location, with a clear intent to document events in real-time. This approach is commonly used for various settings, including weddings, corporate events, promotional campaigns, and community gatherings. The primary goal is to create an authentic representation of the event, which helps in preserving cherished memories or promoting a brand in a visually compelling manner.
The Importance of On-site Videography
In a world dominated by digital content, On-site videography plays a crucial role in capturing and communicating the essence of an event. By recording live moments and emotions, videographers can craft narratives that resonate deeply with audiences. These videos serve to engage potential clients, evoke emotions, and preserve memories that can be cherished long after the event has ended. Moreover, they provide businesses with visual content that aids in marketing and brand establishment.
Types of On-site Videography
On-site videography can take several forms, catering to various industries and needs:
- Event Videography: Focused on capturing weddings, parties, and ceremonies, emphasizing the emotions and pivotal moments of the occasion.
- Corporate Videography: Covers conferences, seminars, and corporate events, helping to communicate professionalism and brand messaging.
- Promotional Videography: Used for marketing campaigns, showcasing products or services to engage potential customers effectively.
- Documentary Videography: Captures real-life events, often with a narrative structure, focusing on storytelling.
Essential Equipment for On-site Videography
Cameras and Lenses for On-site Videography
Choosing the right camera is paramount for effective on-site videography. A high-definition camcorder or DSLR camera with video capabilities is essential for capturing crisp, professional-grade footage. Here are some recommended types:
- DSLRs and Mirrorless Cameras: These offer versatility in terms of lens options and image quality, especially in low-light conditions.
- Camcorders: Designed specifically for video production, they often include features like optical zoom, extended recording times, and ergonomic handling.
In addition to cameras, investing in quality lenses can significantly improve the visual experience. Prime lenses provide superior sharpness, while zoom lenses offer flexibility in framing shots without moving the camera.
Stabilization Tools in On-site Videography
No one wants shaky footage disrupting the viewing experience. Therefore, stabilization tools are essential:
- Tripods: These provide a secure base, ensuring stability, which is crucial for interviews or static shots.
- Gimbals: For dynamic movement capturing, gimbals offer smooth footage, compensating for the videographer’s movements.
- Steadicams: Used for more complex shots, they allow for fluid, sweeping movements while maintaining stability.
Audio Equipment for On-site Videography
High-quality audio is just as critical as video quality in on-site videography. Consider the following audio equipment:
- Shotgun Microphones: Directional mics that capture sound from specific directions, minimizing ambient noise.
- Lavalier Microphones: Ideal for interviews or speeches, these small mics can be clipped onto clothing, providing clear audio.
- Audio Recorders: External recorders can capture sound independently, ensuring better audio quality and flexibility in post-production.
Planning Your On-site Videography Shoot
Creating a Shot List for On-site Videography
A well-defined shot list is crucial for organizing your on-site shoot. It serves as a roadmap that guides you through the filming process. Start by identifying key moments, such as:
- Arrival of key guests
- Ceremony highlights (for weddings)
- Specific branding moments (for corporate events)
- Audience reactions
By organizing shots in advance, you’ll minimize indecision during the shoot, ensuring that all essential elements are captured efficiently.
Accessing the Shoot Location
Understanding the shoot location is vital for a successful on-site videography project. Visit the location beforehand whenever possible to assess:
- Lighting conditions at different times
- Possible obstacles that may hinder shooting
- Layout for optimal camera angles
These insights will allow you to make informed decisions on equipment placement and necessary adjustments for optimal results.
Communicating with Clients for On-site Videography
Establishing clear communication with your clients can make or break an on-site videography project. Be sure to cover:
- Client goals: Understanding their expectations and desired outcomes.
- Creative input: Discuss any specific styles or themes they envision.
- Logistics: Confirm date, times, and locations to ensure alignment.
Documenting these discussions can also serve as a reference point for both parties throughout the project.
Techniques for Effective On-site Videography
Utilizing Natural Light in On-site Videography
Natural light can create stunning visuals. Understanding how to manipulate and utilize natural light effectively can enhance your videography. Consider these tips:
- Golden hour: Shoot during the early morning or late afternoon when the light is softer.
- Shadows: Use shadows creatively to add depth to your shots.
- Reflectors: Bring reflectors to bounce light onto subjects, reducing harsh shadows.
Be adaptable and ready to adjust your shooting angle to maintain the best lighting conditions as daylight changes.
Framing and Composition Strategies
Framing and composition are crucial elements in videography. Use guidelines such as:
- Rule of Thirds: Position key elements along intersecting lines to create balance and interest.
- Leading Lines: Draw viewer’s eye into the frame using natural lines found in the environment.
- Depth of Field: Experiment with varying depths to separate subjects from the background, adding visual interest.
Well-composed shots will enhance storytelling and engage viewers more effectively.
Engaging Storytelling Through On-site Videography
Ultimately, storytelling is at the heart of on-site videography. To create engaging narratives:
- Focus on emotions: Capture authentic moments that resonate with audiences.
- Structure your footage: Organize your video in a coherent progression, with a beginning, middle, and end.
- Include interviews: Personal testimonials can add depth and authenticity to the narrative.
Integrating these storytelling techniques will elevate your videography beyond mere documentation, creating a compelling viewing experience.
Post-Production Tips for On-site Videography
Editing Techniques for On-site Videography
Post-production is where your video truly comes to life. To create polished results, consider the following editing techniques:
- Cutting the “fat”: Remove unnecessary footage that doesn’t contribute to the story.
- Transitions: Use clean transitions to maintain flow between scenes, avoiding abrupt cuts.
- Building pacing: Match the pacing of the edits to the tone of the event, creating rhythm in the final piece.
Using professional video editing software can help streamline the editing process and offer advanced tools for enhancing videos.
Color Grading in On-site Videography
Color grading is essential for establishing mood and aesthetic. Tips for effective color grading include:
- Consistency: Ensure colors are uniform across all shots for continuity.
- Emotional tone: Use color temperature to reflect emotions, such as warm colors for happiness and cool colors for sadness.
- Preserving highlights: Avoid overexposing highlights to maintain detail in bright elements.
Color grading can significantly enhance the professional look and emotional impact of your videos.
Delivering the Final Product
After all the hard work, delivering the final product is a crucial step. Ensure that:
- File formats are appropriate for the client’s needs (e.g., online sharing, DVD, etc.).
- Quality checks are performed to ensure that there are no technical issues in the final video.
- Delivery timelines are maintained, respecting any prior agreements with clients.
Creating a compelling delivery package, possibly including behind-the-scenes footage or a highlight reel, can enhance the client’s experience.
FAQs About On-site Videography
What is on-site videography?
On-site videography refers to the process of recording video content at a specific location, often for events like weddings, corporate functions, or community gatherings.
Why is on-site videography important?
It captures real-time moments and emotions, providing an authentic representation of events and preserving memories for clients and audiences.
What equipment do I need for on-site videography?
Essential equipment includes high-quality cameras, stabilizers, microphones, and lighting gear to ensure professional results.
How can I improve my on-site videography skills?
Practice regularly, study compositions, understand lighting, and analyze successful videography works to enhance your technical and creative skills.
What is the typical process after filming for on-site videography?
Post-production involves editing the footage, color grading, adding audio, and finalizing the product for delivery to clients.